---"更新舊部落分享文章**遇FDZ"網友疑問*使用>> XMPP,ejabberd使測試但~我的所有帳號都不能使用的解決方法~!*-
---"옛 부족 공유에게 문서를 업데이트**충족 FDZ"네티즌 의심*사용 >> XMPP는, ejabberd 테스트the 솔루션을하지만 내 계정이 사용되지 않습니다 -모든~*!-
---"Mettre à jour l'ancienne tribu Partager l'article**rencontrés Fdz"internautes doutent*Utiliser >> XMPP, ejabberd faire la solution testée mais -toutes mes comptes ne sont pas utilisés~*!-
---"Ĝisdatigi la malnova triba Konigi la artikolo**renkontis FDZ"cibernautas dubi *Uzo >> XMPP, ejabberd fari la solvo provita sed -all miaj kontoj ne estas uzataj ~*!-
**USA/UK/TW/SEAOUL KOREAN/HKS/MACAU(FDZ)/FR/UKN/CAL/JP/PH/VI/DE/FA?POL/MAL/HO/RU/THAI/PY/SAN/INDON/ESP`/........All the world lauguage**-
*
**--Please use Google with a
large family of God translator to translate your country / language city Oh ^ ^
--請各位用家善用谷歌大神的翻譯器,來翻譯你們的國家/城市的語言喔^^
--Por favor, use o Google com
uma grande familia de Deus tradutor para traduzir sua cidade pais / idioma Oh ^
^
--** - 국가 / 언어 시 를 번역하는 하나님 번역기 의 큰 가족과 함께 구글을 사용하십시오 아 ^ ^
--S'il vous plait utilisez
Google avec une grande famille de Dieu traducteur pour traduire votre ville de
pays / langue Oh ^ ^
--Bitte verwenden Sie Google
mit einer grosen Familie Gottes Ubersetzer zu Ihrem Land / Sprache ubersetzen
Stadt Oh ^ ^
--*** - あなたの国/言語の街を翻訳する神トランスレータの大きなファミリーでGoogleを使用してくださいああ^ ^
** - Sila gunakan Google dengan
keluarga besar penterjemah Tuhan untuk menterjemahkan bandar negara / bahasa
anda Oh ^ ^
--** - Utilice Google con una
gran familia de Dios traductor para traducir tu ciudad país / idioma Oh ^ ^
** - Si prega di utilizzare
Google con una grande famiglia di Dio traduttore per tradurre la tua città paese / lingua Oh ^ ^
--Sila gunakan Google dengan
keluarga besar penterjemah Tuhan untuk menterjemahkan bandar negara / bahasa
anda Oh ^ ^
--Bonvole uzu Google kun
granda familio de Dio tradukisto traduki via lando / lingvo urbon Ho ^ ^

Using XMPP, PHP and JavaScript web applications in real time
-------------------------------------------------- -----------------
Introduction: Real-time web applications are networked applications,
With a web-based user interface, the ability to display Internet information just released.
Such applications examples include social news aggregators and monitoring tools,
They can use data from an external source is continuously updated.
In this tutorial, you will create a small notification tool Pingstream,
It uses PHP and JavaScript through the Extensible Messaging and ---
--- Presence Protocol (XMPP) for communication,
XMPP is a group designed to support online and real-time communication capabilities of XML technology.
Introduction == XMPP ==
This section briefly describes the XMPP, its origin,
And why it is a protocol for real-time web communications.
You will examine the components of XMPP communication settings and view examples demonstrate how to use these components.
== Obtain and install an XMPP server ==
In this section, you will install Openfire XMPP server and configure it to support your real-time web applications.
Select an XMPP server
There are two leading open source XMPP server can be downloaded for free.
== They are widely used and version 2 license by GNU Public License,
Each server has its own advantages and disadvantages:
ejabberd: ejabberd in e refers Erlang, a kind of soft real-time programming languages.
This technology enables the cornerstone ejabberd very quickly.
== It is also highly compatible with XMPP core and related standards.
ejabberd can be installed in most environments.
Openfire: Openfire with Java ™ language, user-friendly, easy to install.
This tutorial uses Openfire.
-------------------------------------------------- ------------
==Create Openfire database==
Create a new MySQL database for your Openfire user and configuration.
By using MySQL, you can programmatically from your PHP web application to add,
Edit, delete, and query your XMPP server users,
And adjusting your XMPP infrastructure to match your web infrastructure.
If you installed phpMyAdmin, for example as part of your XAMPP installation,
Then you can create a database in accordance with the following steps:
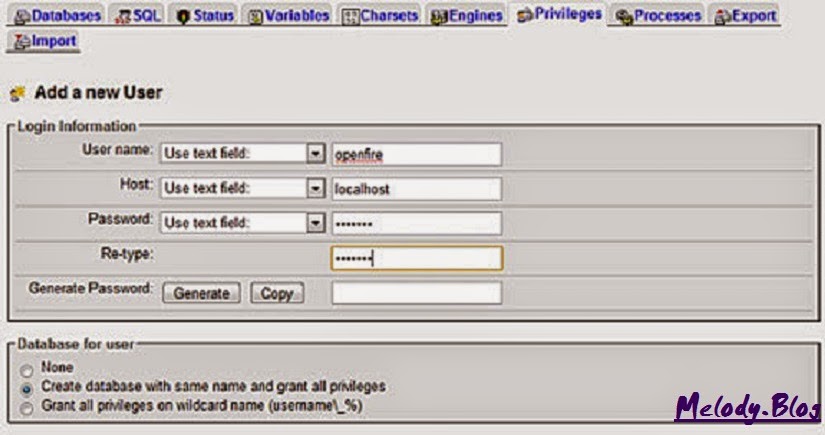
1. Choose Privileges from the main interface.
2. Select the Add a new user.
3. Add user details (make sure the host is localhost;
This tutorial assumes that you are testing on localhost),
Select Create database with same name and grant all privileges,
As shown in Figure 1. Do not give a global database privileges to your database Openfire new users!
Figure 1. Adding a Openfire database in phpMyAdmin.
After adding the user and the database, you can install the Openfire server.Installation Openfire
Download Openfire installer and run it,
The Openfire install to a location of your choice (see Resources).
(You can also choose from the Subversion source code repository Openfire Openfire's checks ---
--- The latest version and build it locally, but this topic is beyond the scope of this tutorial. )
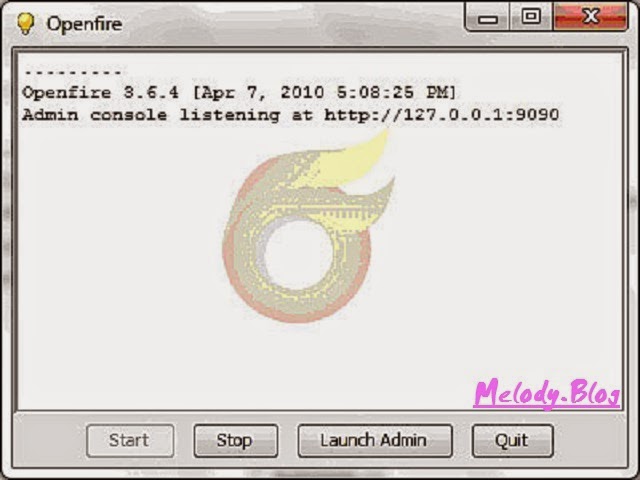
When prompted, told Openfire installer starts the server when the installation is complete.
After the server starts, you should see the server status window, shown in Figure 2:
Figure 2. Openfire status window.
 Click Launch Admin to open a web-based wizard, shown in Figure 3,
The wizard will take you step by step to configure your Openfire server:
Figure 3. Configuration Wizard.
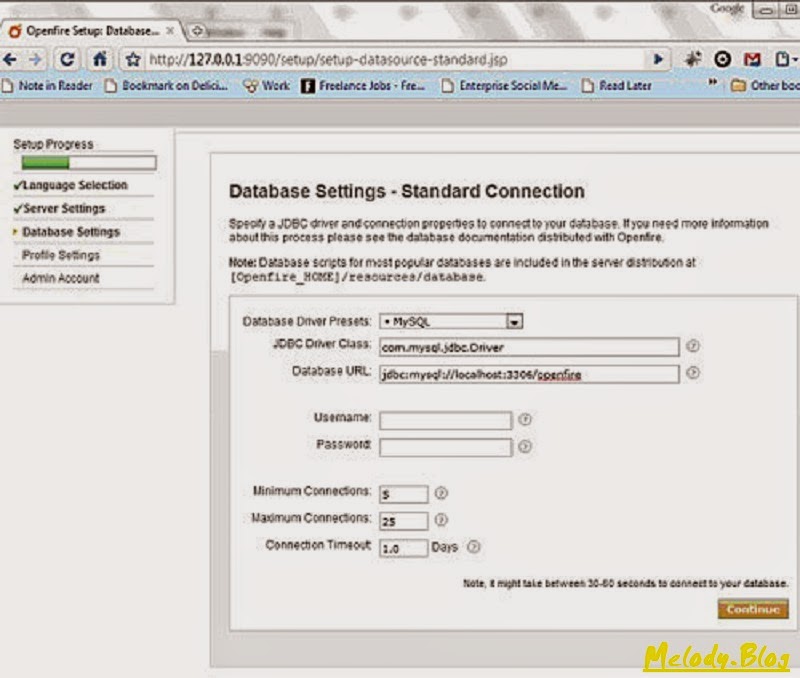 Configuration Wizard allows you to choose to use the standard database connection or an embedded database connection.
Select the standard database connection, so you can use your MySQL database.
From the Database Driver Presets list, select MySQL.
Your server and database name into Database URL field.
For example, set on localhost, MySQL database called openfire in terms of,
Enter:
jdbc: mysql: // localhost: 3306 / openfire
On the next screen of the wizard, select the user accounts are stored in the database.
Enter the database user name and password you created earlier, and then continued until the end of the configuration wizard.
At this point, you should have created a server administrator for your XMPP server and set up field position!
Use your administrator credentials to log on to establish management screen.
Click the Edit Properties (located under Server ports), record the server name listed.
This name will form part JIDs of your domain.
The names are not interchangeable,
For example, you can not use localhost replace 127.0.0.1, nor vice versa.
Click on the top navigation menu Users / Groups and create two new users.
These users will you test users in the development process.
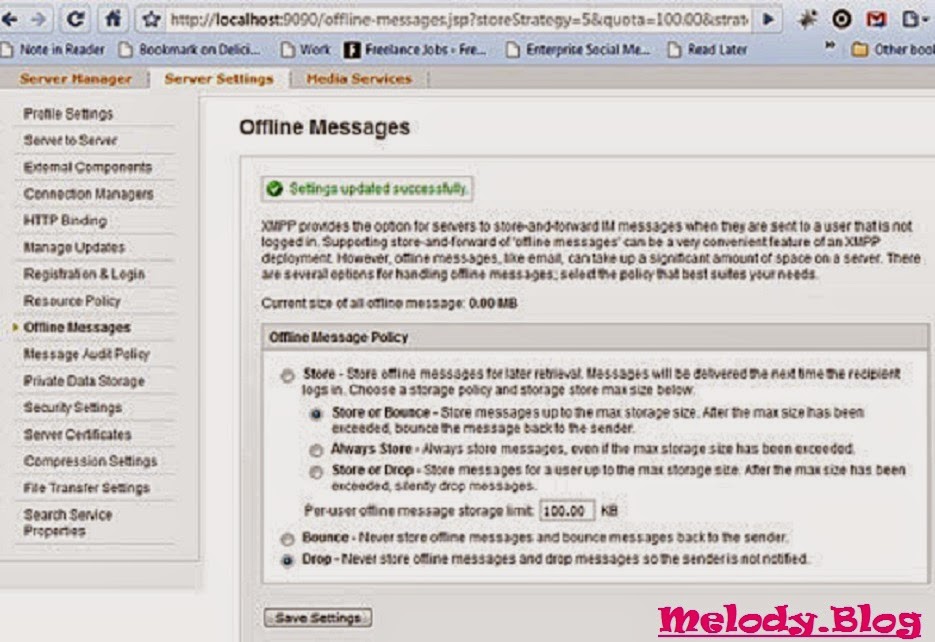
Click Server settings, and then click Offline messages.
Because you will XMPP interface for notifications,
Offline Message Policy should therefore be set to Drop, shown in Figure 4.
You do not want to save the message received when the user is not logged in, otherwise,
When they return, might be "flooded" with thousands of notifications.
Plug-per-user notification demonstration purposes of this tutorial, you will only need to use two user-created here.
However, if you want your application to support complex per user notification,
So you need to be able to programmatically add and remove users from the PHP part of your application.
Openfire via a plug-in User Service for XMPP
User Management REST interface to provide you with this function.
To install this plugin, download it from the Openfire plug-site (see Resources).
Plug-in itself is a single file: userservice.jar.
You must be placed into your Openfire installation / plu gins directory.
[url = XMPP Standards Foundation] XMPP visit the official site:
[/url]http://xmpp.org/ . [URL]
Explore the details of XMPP, and learn how to use it for simple messaging =
[url] http://www.ibm.com/developerworks/cn/xml/x-xmppintro/ .[URL]
Scalable messaging and presence protocol (XMPP).
Using XMPP, SMS, pureXML and PHP to create an alarm system.
Learn how to use Ajax polling to implement a real-time web application
[URL]http://www.ibm.com/developerworks/cn/web/wa-aj-socket/ URL]
Learn how to use this web scripting language
[URL] http://zh.wikipedia.org/wiki/%E9%80%9A%E7%94%A8%E7%BD%91%E5%85%B3%E6%8E%A5%E5%8F%A3 .[URL]
[URL]http://www.informit.com/library/content.aspx?b=STY_JavaScript_24_hours&seqNum=10 . [URL]
Learn more about this use XMPP server written in Erlang
[URL]http://processone.github.io/exmpp/ .[URL]
http://www.ibm.com/developerworks/cn/xml/tutorials/x-realtimeXMPPtut/ .
Personalize your developerWorks experience
[URL] http://subject.csdn.net/dw10/ .
http://www.ibm.com/developerworks/ .
Figure 4. Discard offline messages
..
In the Server settings, click Server to Server.
For this article, you do not need to connect to an external server,
Because you do not need a bigger XMPP networks
A connection part of the operation.
Therefore, the Service Enabled is set to Disabled,
Allowed to Connect to White List.
These settings will prevent unauthorized connections damage
Configure Apache to be forwarded by BOSH XMPP
Openfire at http: // localhost: 7070 / http-bind maintains a HTTP binding URL,
To access by BOSH.
To use this URL on port 80,
You must configure the Apache HTTP Server to a URL forwarding to this position.
To do this, you need to start the proxy module.
Open your http.conf Apache configuration file and locate the mod_proxy.so and mod_proxy_http.so
LoadModule entries, they are commented out by default.
Removing the pound sign preamble (#), uncommented.
Dynamic Shared Object of the configuration file (DSO) Support section in the appropriate row
(Not necessarily together) should now look like Listing 8:
Listing 8. Enable Apache HTTP Server proxy support
=== Installation process ===
Archipel one of the biggest drawback is reflected in the installation process: documentation content is extremely scarce.
But at least part of the description of the setting is quite clear, but you need to pay attention to a few errors.
The best way is to start from the installation Ejabberd, it requires at least version is 2.1.6,
Best to use a binary installation tool.
Next, you need to add ejabberd_xmlrpc and mod_admin_extra modules
To extend the XMPP server.
For this reason, access to source code written in Erlang,
Then * .beam thus obtained a copy of the file ---
--- To Ejabberd daemon ebin directory (code segment 1 and segment 2 code).
After completing this step, you need to modify /opt/ejabberd?2.1.6/conf/ejabberd.cfg
(Depending on the release may be, this file may be / etc /ejabberd/ejabberd.cfg).
To do this, enable the module you just created; and most importantly, the input is fully compliant domain name (FQDN).
Unfortunately, the configuration method described in Archipel project is misleading in many respects;
To do this, you should probably follow the code segment 3.
Code section 1: ejabberd_xmlrpc
wget http://www.ejabberd.im/files/contributions/
xmlrpc? 1.13? ipr2.tgz
tar? xzvf xmlrpc? 1.13? ipr2.tgz
cd xmlrpc? 1.13 / src
make
cd ../../
cp ebin / *. beam /opt/ejabberd?2.1.6/lib/ejabberd?2.1.6/ebin
Finally, create an administrator account to complete Ejabberd settings:
eejabberdctl register admin FQDN password
Set Archipel proxy process to be a little faster, start from dependency checking,
To do this you need Python version 2.5 or later,
Libvirt version 0.8.7 or later, KVM hypervisor, etc.,
And Qemu version 0.12.5 or later.
In addition, you should have Qemu-img and Python Settings tool.
Code segment 2: mod_admin_extra
cd / usr / local / src / ejabberd? modules / mod_admin_extra / trunk /
./build.sh
cp ebin / mod_admin_extra.beam
/opt/ejabberd?2.1.6/lib/ejabberd?2.1.6/ebin
Snippet 3: ejabberd.cfg
01 {hosts, ["jabber.deutschewolke.datenwerk? It.de"]}.
02 [...]
03 {listen,
04 [
05 {4560, ejabberd_xmlrpc, []},
[06 {5280, ejabberd_http, [
07 http_bind,
08 http_poll,
09 web_admin
10]}
11]}.
12 [...]
13 {modules,
14 [
15 {mod_adhoc, []},
16 {mod_http_bind, []},
17 [...]
18 {mod_admin_extra, []}
19]}.
20 [...]
The following sequence of commands to install the Archipel Agent:
easy_install archipel? agent
archipel? initinstall
Now, you need to add the FQDN of the server to /etc/archipel/archipel.conf,
Use the init script provided to start Archipel:
/etc/init.d/archipel start
Finally, you need two Ejabberd pubsub node, ensure that the permissions management systems and tags can work:
archipel? tagnode ?? jid = admin @ FQDN ?? password = Password ?? create
SUCCESS: pubsub node / archipel / tags created!
archipel? rolesnode? jid = admin @ FQDN ?? password = Password ?? create
SUCCESS: pubsub node / archipel / roles created!
You do not need to manually create a client, there is described in detail in the Archipel wiki.
But as long as the client select the latest release of Archipel, unzip it to a local directory,
Open index.html in your browser.
As for when you log on, enter the fully very important compliant Jabber ID; that is,
The ID must include the full name of the server (Figure).
Log on Archipel client is concerned, you need to Jabber ID field
Enter the full login name (including domain).
Your password is needed here login information that you specify when you create an administrator account.
URL Service BOSH field follow http: // FQDN: 5280 / http bind this model !!?
http://melody-free-shaing.blogspot.com/2014/11/update-old-tribal-share-articlemet.html
=============================================
**使用XMPP 構建一個基於web 的通知工具
使用XMPP、PHP和JavaScript編寫實時web應用程序
-------------------------------------------------------------------
簡介:實時web應用程序是聯網的應用程序,
帶有基於web的用戶界面,能夠及時顯示剛剛發布的Internet信息。
這樣的應用程序示例包括社會新聞聚合器和監控工具,
它們能夠使用來自外部源的數據持續更新。
在本教程中,您將創建一個小型通知工具Pingstream,
它使用PHP 和JavaScript 通過Extensible Messaging and ---
---Presence Protocol (XMPP) 進行通信,
XMPP 是一組設計用於支持聯機狀態和實時通信功能的XML 技術 .
==XMPP簡介==
本小節將簡要介紹XMPP,它的起源,
以及為何它是一個適合實時web 通信的協議。
您將檢查XMPP 通信設置的組件,並查看展示這些組件如何使用的示例。
==獲取和安裝一個XMPP服務器==
在本小節中,您將安裝Openfire XMPP 服務器並配置它來支持您的實時web 應用程序。
選擇一個XMPP服務器
有兩個領先的開源XMPP 服務器可以免費下載。
==它們都應用廣泛並通過GNU Public License version 2 許可,
每個服務器都有自己的優勢和缺點:
ejabberd:ejabberd中的e指的是Erlang,一種軟實時編程語言。
這一技術基石使ejabberd 非常快。
==它還與XMPP 核心和相關標準高度兼容。
ejabberd 可以安裝在大多數環境中。
Openfire:Openfire 用Java™ 語言編寫,用戶友好,安裝方便。
本教程使用Openfire。
--------------------------------------------------------------
==創建Openfire數據庫==
為您的Openfire 用戶和配置創建一個新的MySQL 數據庫。
通過使用MySQL,您可以以編程方式從您的PHP web 應用程序添加、
編輯、刪除和查詢您的XMPP 服務器用戶,
以及調節您的XMPP 基礎設施以匹配您的web 基礎設施。
如果您安裝了phpMyAdmin,比如作為您的XAMPP 安裝的一部分,
那麼您可以按照以下步驟創建數據庫:
1.從主界面選擇Privileges 。
2.選擇Add a new user 。
3.添加用戶細節(確保主機是localhost;
本教程假定您是在localhost上測試),
選擇Create database with same name and grant all privileges ,
如圖1所示。 不要向您的Openfire 數據庫新用戶授予全局數據庫特權 !
圖1.在phpMyAdmin中添加一個Openfire數據庫 .
添加用戶和數據庫後,就可以安裝Openfire 服務器了 .安裝Openfire
下載Openfire安裝程序並運行它,
將Openfire安裝到您選擇的位置(參見參考資料 )。
(您也可以選擇從Openfire 的Subversion 源代碼知識庫檢查Openfire 的---
---最新版本並本地構建它,但這個主題超出了本教程的範圍。)
收到提示時,告知Openfire 安裝程序在安裝完成時啟動服務器。
服務器啟動後,您應該看到服務器狀態窗口,如圖2所示:
圖2. Openfire的狀態窗口 .
單擊Launch Admin打開一個基於web的嚮導,如圖3所示,該嚮導將帶您逐步配置您的Openfire服務器:
圖3.配置嚮導 .
配置嚮導允許您選擇使用標準數據庫連接或嵌入式數據庫連接。選擇標準數據庫連接,以便您能夠使用您的MySQL 數據庫。
從Database Driver Presets列表選擇MySQL。
將您的服務器和數據庫名稱插入Database URL字段。
例如,對於在localhost 上設置、名為openfire 的MySQL 數據庫而言,
應輸入:
jdbc:mysql://localhost:3306/openfire
在嚮導的下一屏幕上,選擇將用戶帳戶存儲在數據庫中。
輸入此前創建的數據庫用戶的用戶名和密碼,然後一直繼續到配置嚮導結束。
此時,您應該已經為您的XMPP 服務器創建了一個服務器管理員並設置了域位置 !
使用您建立的管理員憑證登錄到管理屏幕。
單擊Edit Properties (位於Server ports下方),記錄列示的服務器名稱。
這個名稱將形成您的JIDs 的域部分。
這個名稱是不可互換的,
比如,不能使用localhost替代127.0.0.1 ,反之也不行。
單擊頂部導航菜單中的Users/Groups並創建兩個新用戶。
這些用戶將您在開發過程中的測試用戶。
單擊Server settings ,然後單擊Offline messages 。
由於您將XMPP用於界面通知,
因此應將Offline Message Policy設置為Drop ,如圖4所示。
您不想保存用戶沒有登錄時收到的消息,否則,
當他們返回時,可能會被數千條通知所“淹沒”。
每用戶通知的插件 根據本教程的演示目的,您將只需使用在這裡創建的兩個用戶。
但是,如果您希望在您的應用程序中支持複雜的每用戶通知,
那麼您需要能夠以編程方式從您的應用程序的PHP 部分添加和移除用戶。
Openfire 的User Service 插件通過一個用於XMPP
用戶管理的REST 界面向您提供這個功能。
要安裝這個插件,從Openfire插件站點(參見參考資料 )下載它。
插件本身是單個文件:userservice.jar。
您必須將其放置到您的Openfire 安裝的/plugins 目錄中 .
[url=XMPP Standards Foundation ]訪問XMPP官方站點:
[/url]http://xmpp.org/ . [URL]
探索XMPP的細節,了解如何將它用於簡單消息傳遞=
[url] http://www.ibm.com/developerworks/cn/xml/x-xmppintro/ .[URL] .
實現可擴展消息傳遞和到場協議(XMPP) .
使用XMPP、SMS、pureXML和PHP創建警報系統 .
了解如何使用Ajax輪詢實現一個實時web應用程序
[URL][URL]http://www.ibm.com/developerworks/cn/web/wa-aj-socket/ URL] .
了解如何使用這個web腳本語言
[URL] http://zh.wikipedia.org/wiki/%E9%80%9A%E7%94%A8%E7%BD%91%E5%85%B3%E6%8E%A5%E5%8F%A3 .[URL]
[URL]http://www.informit.com/library/content.aspx?b=STY_JavaScript_24_hours&seqNum=10 . [URL] .
進一步了解這個用Erlang語言編寫的XMPP服務器
[URL][URL]http://processone.github.io/exmpp/ .[URL]
http://www.ibm.com/developerworks/cn/xml/tutorials/x-realtimeXMPPtut/ .
個性化您的developerWorks體驗
[URL] http://subject.csdn.net/dw10/ .
http://www.ibm.com/developerworks/ .
圖4.丟棄離線消息
在Server settings中,單擊Server to Server 。對於本文,您不必連接到外部服務器,
因為您不需要作為更大的XMPP 網絡的
一個連接部分操作。
因此,將Service Enabled設置為Disabled ,
Allowed to Connect設置為White List 。
這些設置將阻止未授權的連接造成破壞
配置Apache以通過BOSH轉發XMPP
Openfire 在http://localhost:7070/http-bind 維護了一個HTTP 綁定URL,
以便通過BOSH 訪問。
要在端口80 上使用這個URL,
您必須配置Apache HTTP Server 以將一個URL 轉發到這個位置。
為此,您需要啟動代理模塊。
打開您的http.conf Apache配置文件並找到mod_proxy.so和mod_proxy_http.so的
LoadModule條目,它們默認被註釋掉。
移除前導的井字符( # ),取消註釋。
這個配置文件的Dynamic Shared Object (DSO) Support部分中的多個適當的行
(不一定在一起)現在應該類似於清單8 :
清單8.啟用Apache HTTP Server中的代理支持
===安裝過程===
Archipel的其中一個最大缺點體現在安裝過程:說明文檔內容極其匱乏。
但至少,描述設置的部分相當清晰,不過你需要留意幾個錯誤。
最好的辦法就是從安裝Ejabberd入手,它需要版本至少是2.1.6,
最好使用二進制安裝工具。
接下來,你需要添加ejabberd_xmlrpc和mod_admin_extra模塊,
以擴展XMPP服務器。
為此,獲取用Erlang編寫的源代碼,
然後將因而獲得的*.beam文件拷貝---
---到Ejabberd後台駐留程序的ebin目錄(代碼段1和代碼段2)。
完成了這一步後,你需要修改/opt/ejabberd?2.1.6/conf/ejabberd.cfg
(視發行版而定,這個文件可能是/etc /ejabberd/ejabberd.cfg)。
為此,啟用你剛剛創建的模塊;最重要的是,輸入完全符合標準的域名(FQDN)。
遺憾的是,Archipel項目記載的配置方法在許多方面具有誤導性;
為此,你可能應該遵循代碼段3。
代碼段1:ejabberd_xmlrpc
wget http://www.ejabberd.im/files/contributions/
xmlrpc?1.13?ipr2.tgz
tar ?xzvf xmlrpc?1.13?ipr2.tgz
cd xmlrpc?1.13/src
make
cd ../../
cp ebin/*.beam /opt/ejabberd?2.1.6/lib/ejabberd?2.1.6/ebin
最後,創建管理員帳戶,完成Ejabberd的設置:
eejabberdctl register admin FQDN password
設置Archipel代理的過程要快一點,從依賴性檢查開始,
為此你需要Python版本2.5或更新版本、
Libvirt版本0.8.7或更新版本、KVM等虛擬機管理程序,
以及Qemu版本0.12.5或更新版本。
此外,你應該有Qemu-img和Python設置工具。
代碼段2:mod_admin_extra
cd /usr/local/src/ejabberd?modules/mod_admin_extra/trunk/
./build.sh
cp ebin/mod_admin_extra.beam
/opt/ejabberd?2.1.6/lib/ejabberd?2.1.6/ebin
代碼段3:ejabberd.cfg
01 {hosts, ["jabber.deutschewolke.datenwerk?it.de"]}.
02 [...]
03 {listen,
04 [
05 {4560, ejabberd_xmlrpc, []},
[ 06 {5280, ejabberd_http, [
07 http_bind,
08 http_poll,
09 web_admin
10 ]}
11 ]}.
12 [...]
13 {modules,
14 [
15 {mod_adhoc, []},
16 {mod_http_bind,[]},
17 [...]
18 {mod_admin_extra, []}
19 ]}.
20 [...]
下面序列的命令安裝了Archipel代理:
easy_install archipel?agent
archipel?initinstall
現在,你需要把服務器的FQDN添加到/etc/archipel/archipel.conf,
使用提供的init腳本來啟動Archipel:
/etc/init.d/archipel start
最後,你需要兩個Ejabberd pubsub節點,確保權限系統和標記管理可以正常工作:
archipel?tagnode ??jid=admin@FQDN ??password=Password ??create
SUCCESS: pubsub node /archipel/tags created!
archipel?rolesnode ?jid=admin@FQDN ??password=Password ??create
SUCCESS: pubsub node /archipel/roles created!
你不需要手动建立客户端,在Archipel维基中已有详细描述。
而是只要选择最新的Archipel客户端发行版,将它解压缩到本地目录中,
在浏览器中打开index.html。
至於登錄時,輸入完全符合標準的Jabber ID很重要;也就是說,
該ID必須包括完整的服務器名稱(圖)。
就客戶端的Archipel登錄而言,你需要在Jabber ID字段中
輸入完整的登錄名(包括域)。
你在這裡所需的密碼是你在創建管理員帳戶時指定的登錄信息。
Service BOSH字段的URL遵循http://FQDN:5280/http?bind這種模式 !!
http://melody-free-shaing.blogspot.com/2014/11/update-old-tribal-share-articlemet.html
============================================
** 사용 XMPP는a 웹 기반 알림 도구를 구축
실시간으로 사용 XMPP, PHP와 자바 스크립트 웹 애플리케이션
-------------------------------------------------- -----------------
소개 : 실시간 웹 애플리케이션은 네트워크 응용 프로그램입니다,
a웹 기반 사용자 인터페이스를 통해, 인터넷 정보를 표시하는 기능이 최근 공개.
이러한 응용 프로그램의 예는, 소셜 뉴스 수집기와 모니터링 도구가 포함
그들은 연속적으로 업데이트되는an 외부 소스로부터의 데이터를 사용할 수있다.
이 튜토리얼에서는 Pingstream 작은 알림 도구를 만들 것입니다,
그것은 ---the 확장 메시징과를 통해 PHP와 자바 스크립트를 사용합니다
--- 통신을위한 존재 프로토콜 (XMPP)
XMPP는 XML 기술을 온라인으로 실시간 통신 기능을 지원하도록 설계a 기이다.
소개 == XMPP ==
이 절에서는,the XMPP, 그 기원을 설명
그리고 실시간 웹 통신a 프로토콜 이유.
당신은 통신 설정 및보기의 예는 이러한 구성 요소를 사용하는 방법을 보여 XMPP의 구성 요소를 검사합니다.
== 확보 및an XMPP 서버를 설치 ==
이 섹션에서의 Openfire XMPP 서버를 설치하고 실시간으로 웹 응용 프로그램을 지원하도록 구성됩니다.
anXMPP 서버를 선택
XMPP 서버를 무료로 다운로드 할 수있는 두 개의 선도적 인 오픈 소스가 있습니다.
== 그들은 널리 사용되는 버전 2 라이선스 GNU 공중 사용 허가서에 의해,
각 서버는 자신의 장점과 단점이 있습니다 :
ejabberd : 전자에 ejabberd 얼랑, 소프트 실시간 프로그래밍 언어의 종류를 의미한다.
이 기술은 매우 빠르게 초석 ejabberd 수 있습니다.
== 또한 XMPP 코어 및 관련 표준과 높은 호환됩니다.
ejabberd은 대부분의 환경에서 설치할 수 있습니다.
의 Openfire :의 Openfire 자바 (Java ™) 언어, 사용자 친화적 인, 설치하기 쉬운.
이 튜토리얼의 Openfire를 사용합니다.
-------------------------------------------------- ------------
==의 Openfire 데이터베이스를 만들기 ==
당신의 Openfire 사용자 및 구성의 새로운 MySQL 데이터베이스를 만듭니다.
MySQL을 사용하여 프로그래밍 방식으로 PHP 웹 애플리케이션에서 추가 할 수 있습니다,
편집, 삭제 및 XMPP 서버 사용자를 조회
그리고 당신의 XMPP 인프라를 조정하면 웹 인프라하였습니다.
당신이 당신의 XAMPP 설치의 일부로 예를 들어 phpMyAdmin을을 설치 한 경우,
그런 다음,the 다음 단계에 따라a 데이터베이스를 만들 수있다 :
메인 인터페이스에서 권한을 선택합니다.
2. 새 사용자 추가를 선택합니다.
3. 사용자 정보를 (호스트가 로컬 호스트인지 확인 추가;
이 튜토리얼은)는 로컬 호스트에서 테스트하는 것으로 가정
같은 이름의 데이터베이스 생성을 선택하고 모든 권한을 부여,
데이터베이스의 Openfire 새로운 사용자에게 글로벌 데이터베이스 권한을 부여하지 마십시오 그림 1에 나타낸 바와 같이!
그림 1. phpMyAdmin을에서의 Openfire 데이터베이스 추가.
사용자와 데이터베이스를 추가 한 후에는 오픈 파이어를 설치할 수 있습니다.설치의 Openfire
의 Openfire 설치 프로그램을 다운로드하고 실행,
The의 Openfire 당신의 선택 (참고 자료 참조)의 위치에 설치합니다.
(당신은 또한 서브 버전 소스 코드 저장소에서의 Openfire의 Openfire의 검사를 선택할 수 있습니다 ---
--- 최신 버전과 로컬을 구축,하지만이 주제는이 튜토리얼의 범위를 벗어납니다. )
메시지가 표시되면, 설치가 완료 될 때의 Openfire 설치 프로그램은 서버를 시작했다.
서버가 시작되면, 당신은 그림 2와 같이 서버 상태 창을 볼 수 :
그림 2의 Openfire 상태 창.
그림 3과 같이 웹 기반 마법사를 열려면 시작 관리자를 클릭마법사는 당신이 당신의 Openfire 서버를 구성하는 단계별로 취할 것입니다 :
3. 구성 마법사를 그림.
구성 마법사는 표준 데이터베이스 연결 또는an 포함 된 데이터베이스 연결을 사용하도록 선택할 수 있습니다.당신이 당신의 MySQL 데이터베이스를 사용할 수 있도록,the 표준 데이터베이스 연결을 선택합니다.
데이터베이스 드라이버 사전 설정 목록에서 MySQL을 선택합니다.
데이터베이스 URL 필드에 서버 및 데이터베이스 이름.
예를 들어, 로컬 호스트에서 설정, MySQL 데이터베이스, 용어에서의 Openfire라고
입력 :
JDBC한다 : mysql : // localhost를 : 3306 /의 Openfire
마법사의 다음 화면에서 계정이 데이터베이스에 저장되어있는 사용자를 선택합니다.
데이터베이스 사용자 이름과 암호가 이전에 만든 후 구성 마법사가 끝날 때까지 계속를 입력합니다.
이 시점에서, 당신은 당신의 XMPP 서버에 대한 서버 관리자를 생성 및 현장 위치를 설정해야한다!
관리 화면을 설정하는 데에 관리자 자격 증명을 사용하여 로그온합니다.
(서버 포트 아래에 위치)the 속성 편집을 클릭 나열된 서버 이름을 기록한다.
이 이름은 도메인의 일부가 JID를을 형성 할 것이다.
이름은 서로 호환되지 않습니다,
예를 들어, localhost를 사용 127.0.0.1 않으며, 그 반대를 대체 할 수 없습니다.
상단 네비게이션 메뉴의 사용자 / 그룹을 클릭하고 두 개의 새로운 사용자를 만들 수 있습니다.
이러한 사용자는 개발 과정에서 사용자를 테스트합니다.
서버 설정을 클릭 한 다음 오프라인 메시지를 클릭합니다.
당신은 알림 인터페이스를 XMPP 것이기 때문에,
오프라인 메시지 정책은 따라서도 4에 도시 된 드롭하도록 설정되어야한다.
당신은, 그렇지 않으면, 사용자가 로그인하지 않을 경우 메시지가 수신 저장하지 않으
그들이 돌아 오면 알림 수천 "홍수"될 수 있습니다.
플러그인 사용자 별이 튜토리얼의 알림 데모 용으로, 당신은 두 사용자가 만든 여기를 사용해야합니다.
그러나 응용 프로그램이 복잡한 사용자 별 알림을 지원하려는 경우,
그래서 당신은 프로그래밍 응용 프로그램의 PHP 부분에서 사용자를 추가하고 제거 할 수 있어야합니다.
XMPP를위한 플러그 - 인 사용자 서비스를 통해의 Openfire
사용자 관리 REST 인터페이스는이 기능을 제공합니다.
이 플러그인을 설치,the의 Openfire 플러그인 사이트 (참고 자료 참조)에서 다운로드.
userservice.jar : 플러그인 자체는 단일 파일입니다.
당신은 당신의 Openfire 설치 / PLU gins 디렉토리에 배치해야합니다.
[URL = XMPP 표준 재단] XMPP는 공식 사이트를 방문하십시오 :
[/url]http://xmpp.org/ . [URL]
XMPP의 세부 사항을 살펴보고 간단한 메시징을 위해 사용하는 방법 =
[URL] http://www.ibm.com/developerworks/cn/xml/x-xmppintro/ . [URL]
확장 메시징 및 현재 상태 프로토콜 (XMPP).
XMPP, SMS,의 pureXML과 PHP를 사용하여an 경보 시스템을 만들 수 있습니다.
a실시간 웹 응용 프로그램을 구현하는 아약스 폴링을 사용하는 방법에 대해 알아보십시오
[URL] http://www.ibm.com/developerworks/cn/web/wa-aj-socket/ [URL]
이 웹 스크립트 언어를 사용하는 방법에 대해 알아보십시오
[URL] http://zh.wikipedia.org/wiki/%E9%80%9A%E7%94%A8%E7%BD%91%E5%85%B3%E6%8E%A5%E5%8F% A3 . [URL]
[URL] http://www.informit.com/library/content.aspx?b=STY_JavaScript_24_hours&seqNum=10 . [URL]
얼랑에 기록이 사용 XMPP 서버에 대해 자세히 알아보기
[URL] http://processone.github.io/exmpp/ . [URL]
http://www.ibm.com/developerworks/cn/xml/tutorials/x-realtimeXMPPtut/ .
developerWorks와 관련된 경험을 개인화
[URL] http://subject.csdn.net/dw10/ .
http://www.ibm.com/developerworks/ .
그림 4. 폐기 오프라인 메시지
the서버 설정에서 서버에 서버를 클릭합니다.이 문서의 경우, 외부 서버에 연결할 필요가 없습니다,
당신은 더 큰 XMPP 네트워크를 필요로하지 않기 때문에
동작의A 연결 부분입니다.
따라서, 활성화 된 서비스가 Disabled로 설정되어,
화이트리스트에 연결할 수.
이러한 설정은 무단 연결 손상을 방지 할
아파치를 구성합니다 BOSH XMPP에 의해 전달합니다
의 Openfire는 HTTP에서 : // localhost를 : 7070 / HTTP-바인딩은 HTTP 바인딩 URL을 유지
BOSH하여 액세스합니다.
포트 80에서이 URL을 사용하려면,
이 위치로a URL 전달에 아파치 HTTP 서버를 구성해야합니다.
이렇게하려면, 당신은 프록시 모듈을 시작해야합니다.
당신의하여 http.conf 아파치 설정 파일을 열고 mod_proxy.so과 mod_proxy_http.so를 찾습니다
LoadModule 지정 항목, 그들은 기본적으로 주석하고 있습니다.
the파운드 기호 프리앰블 (#)를 제거, 주석.
the적절한 행the 구성 파일의 동적 공유 객체 (DSO) 지원 섹션
(반드시 함께)는 이제 Listing 8과 같이해야합니다 :
아파치 HTTP 서버 프록시 지원을 활성화 8. 목록
=== 설치 과정 ===
ARCHIPELthe 가장 큰 단점 중 하나는the 설치 프로세스에 반영된다 : 문서 함량이 매우 부족하다.
그러나 설정에 대한 설명의 적어도 일부는 매우 분명하다,하지만 당신은 몇 가지 오류에주의를 지불해야합니다.
가장 좋은 방법은, 적어도 버전은 2.1.6이다가 필요, 설치 Ejabberd에서 시작하는 것입니다
베스트 바이너리 설치 도구를 사용합니다.
다음으로, ejabberd_xmlrpc과 mod_admin_extra 모듈을 추가 할 필요가
theXMPP 서버를 확장합니다.
이러한 이유로, 얼랑 작성된 소스 코드에 액세스
이어서 * .beam 따라서 ---the 파일의 복사본을 수득
--- Ejabberd 데몬 EBIN 디렉토리 (코드 세그먼트 1 세그먼트 2 코드)에.
이 단계를 완료 한 후에는 /opt/ejabberd?2.1.6/conf/ejabberd.cfg을 수정해야
(릴리스가있을 수 있습니다에 따라,이 파일을 / etc /ejabberd/ejabberd.cfg을 할 수있다).
이렇게하려면 방금 만든 모듈을 활성화; 그리고 가장 중요한 것은,the 입력은 완벽하게 호환 된 도메인 이름 (FQDN)입니다.
불행하게도, ARCHIPEL 프로젝트에 기술 된 구성 방법은 여러면에서 오해의 소지가;
이렇게하려면, 당신은 아마 코드 세그먼트 (3)을 따라야한다.
코드 섹션 1 : ejabberd_xmlrpc
wget을 http://www.ejabberd.im/files/contributions/
XMLRPC? 1.13? ipr2.tgz
타르? xzvf XMLRPC? 1.13? ipr2.tgz
CD의 XMLRPC? 1.13 / SRC
확인
CD ../../
CP의 EBIN / *. 빔 /opt/ejabberd?2.1.6/lib/ejabberd?2.1.6/ebin
마지막으로, Ejabberd 설정을 완료하려면 관리자 계정을 생성합니다 :
eejabberdctl 관리자 FQDN 비밀번호를 등록
조금 더 빠른 것으로 ARCHIPEL 프록시 프로세스를 설정, 종속성 검사에서 시작,
이 작업을 수행하려면, 2.5 이상 파이썬 버전이 필요
등 libvirt를 버전 0.8.7 이상, KVM 하이퍼 바이저,
그리고 Qemu에서는 버전 0.12.5 이상이 필요합니다.
또한, 당신은 Qemu-IMG 파이썬 설정 도구가 있어야합니다.
코드 세그먼트 2 : mod_admin_extra
CD / usr / 지방 / SRC / ejabberd? 모듈 / mod_admin_extra / 트렁크 /
./build.sh
CP의 EBIN / mod_admin_extra.beam
/opt/ejabberd?2.1.6/lib/ejabberd?2.1.6/ebin
짧은 발췌문 3 : ejabberd.cfg
01 {호스트 [ "jabber.deutschewolke.datenwerk? It.de"]}.
02 [...]
03 {듣고,
04
05 {4560, ejabberd_xmlrpc, []},
[06 {5280, ejabberd_http, [
07 http_bind,
08 http_poll,
09 web_admin
(10)]}
(11)]}.
12 [...]
(13) {모듈,
14 [
15 mod_adhoc {[]},
16 mod_http_bind {[]},
17 [...]
18 mod_admin_extra {[]}
(19)]}.
20 [...]
다음의 명령 순서는 ARCHIPEL 에이전트를 설치하려면
easy_install을 ARCHIPEL? 대리인
ARCHIPEL? initInstall를
이제, 당신이 /etc/archipel/archipel.conf에 서버의 FQDN을 추가해야합니다,
ARCHIPEL을 시작하기 위해 제공the init 스크립트를 사용하여
시작 /etc/init.d/archipel
마지막으로, 당신은 두 Ejabberd의 pubsub 노드, 권한 관리 시스템 및 태그가 작동 할 수 있는지 확인이 필요합니다 :
ARCHIPEL? tagnode ?? JID = 관리자 FQDN @ ?? 암호 = 암호? 생성
성공 : pubsub 노드 / ARCHIPEL / 태그 생성!
ARCHIPEL? rolesnode? JID = 관리자 FQDN @ ?? 암호 = 암호? 생성
성공 : pubsub 노드 / ARCHIPEL / 역할이 생성!
당신은 ARCHIPEL 위키에 자세히가 설명되어 수동으로 클라이언트를 만들 필요가 없습니다.
그러나 한 클라이언트가 ARCHIPEL의 최신 릴리스를 선택할 때, 로컬 디렉토리에 압축을 풉니 다
브라우저에서 index.html을 열어.
당신이 로그온the 완전히 매우 중요 준수 재버 ID를 입력 할 때에 관해서; 즉,
TheID 서버 (그림)의 전체 이름을 포함해야합니다.
우려 ARCHIPEL 클라이언트에 로그인하면 재버 ID 필드에 필요
(도메인 포함) 전체 로그인 이름을 입력합니다.
비밀번호는 여기에 필요한 관리자 계정을 만들 때 사용자가 지정한 정보를 로그인한다.
URL 서비스 BOSH 필드 추적에 http : // FQDN : 5280 / HTTP 바인딩이 모델을!?
http://melody-free-shaing.blogspot.com/2014/11/update-old-tribal-share-articlemet.html
=============================================
** Utilisation XMPP pour construire un outil de notification sur le Web
Utilisation XMPP, PHP et JavaScript applications web en temps réel
-------------------------------------------------- -----------------
Introduction: les applications web en temps réel sont des applications en réseau,
Avec une interface utilisateur basée sur le Web, la possibilité d'afficher des informations sur Internet vient de sortir.
Ces exemples d'applications comprennent les agrégateurs de nouvelles sociaux et des outils de surveillance,
Ils peuvent utiliser les données provenant d'une source externe est continuellement mis à jour.
Dans ce tutoriel, vous allez créer un petit outil de notification Pingstream,
Il utilise PHP et JavaScript à travers le Extensible Messaging and ---
--- Presence Protocol (XMPP) de communication,
XMPP est un groupe destiné à soutenir des fonctionnalités en ligne et de la communication en temps réel de la technologie XML.
Présentation == == XMPP
Cette section décrit brièvement le XMPP, son origine,
Et pourquoi il est un protocole de communication web en temps réel.
Vous examinerez les composants de XMPP paramètres de communication et d'afficher les exemples montrent comment utiliser ces composants.
== Obtenir et installer un serveur XMPP ==
Dans cette section, vous allez installer le serveur Openfire XMPP et le configurer pour soutenir vos applications web en temps réel.
Sélectionnez un serveur XMPP
Il ya deux principaux open source serveur XMPP peut être téléchargé gratuitement.
== Ils sont largement utilisés et la version 2 de la licence GNU Public License,
Chaque serveur a ses propres avantages et inconvénients:
ejabberd: ejabberd dans e se réfère Erlang, une sorte de langages de programmation temps réel souple.
Cette technologie permet très rapidement la pierre angulaire ejabberd.
== Il est également très compatible avec XMPP cœur et des normes connexes.
ejabberd peut être installé dans la plupart des environnements.
Openfire: Openfire avec le langage Java ™, facile à installer, facile à utiliser.
Ce tutoriel utilise Openfire.
-------------------------------------------------- ------------
== == Créer base de données Openfire
Créer une nouvelle base de données MySQL pour votre utilisateur Openfire et configuration.
En utilisant MySQL, vous pouvez par programmation à partir de votre application web PHP pour ajouter,
Modifier, supprimer, et d'interroger les utilisateurs de votre serveur XMPP,
Et l'ajustement de votre infrastructure de XMPP pour correspondre à votre infrastructure Web.
Si vous avez installé phpMyAdmin, par exemple dans le cadre de votre installation de XAMPP,
Ensuite, vous pouvez créer une base de données en suivant les étapes suivantes:
1. Choisissez les privilèges de l'interface principale.
2. Sélectionnez le ajouter un nouvel utilisateur.
3. Ajouter les détails des utilisateurs (assurez-vous que l'hôte est localhost;
Ce tutoriel suppose que vous testez sur localhost),
Sélectionnez Créer la base de données avec le même nom et tous les privilèges,
Comme le montre la figure 1. Ne pas donner de privilèges globaux de base de données à votre base de données Openfire nouveaux utilisateurs!
Figure 1. Ajout d'une base de données Openfire dans phpMyAdmin.
Après l'ajout de l'utilisateur et la base de données, vous pouvez installer le serveur Openfire.Installation Openfire
Télécharger Openfire installation et l'exécuter,
Le Openfire installer à un endroit de votre choix (voir Ressources).
(Vous pouvez également choisir à partir du code source de Subversion chèques de Openfire Openfire ---
--- La dernière version et construire localement, mais ce sujet dépasse le cadre de ce tutoriel. )
Lorsque vous êtes invité, dit Openfire installation démarre le serveur lorsque l'installation est terminée.
Après le démarrage du serveur, vous devriez voir la fenêtre d'état du serveur, montré à la figure 2:
Figure 2. Fenêtre d'état Openfire.
Cliquez sur Lancer administration pour ouvrir un assistant basé sur le Web, le montre la figure 3,L'assistant vous guidera pas à pas pour configurer votre serveur Openfire:
Figure 3. Assistant de configuration.
Assistant de configuration vous permet de choisir d'utiliser la connexion de base de données standard ou une connexion de base de données intégré.Sélectionnez la connexion de base de données standard, de sorte que vous pouvez utiliser votre base de données MySQL.
Dans la liste des Presets du pilote de base de données, sélectionnez MySQL.
Votre serveur et base de données nom dans le champ de base de données d'URL.
Par exemple, mettre sur localhost, base de données MySQL appelée openfire en termes de,
Entrée:
jdbc: mysql: // localhost: 3306 / openfire
Sur l'écran suivant de l'assistant, sélectionnez l'utilisateur comptes sont stockés dans la base de données.
Entrez le nom d'utilisateur de base de données et le mot de passe que vous avez créé plus tôt, et a ensuite continué jusqu'à la fin de l'assistant de configuration.
À ce stade, vous devez avoir créé un administrateur de serveur pour votre serveur XMPP et mettre en place la position du champ!
Utilisez vos pouvoirs d'administrateur pour se connecter à établir écran de gestion.
Cliquez sur Modifier les propriétés (situé sous les ports du serveur), enregistrer le nom du serveur indiqué.
Ce nom fera partie JIDs de votre domaine.
Les noms ne sont pas interchangeables,
Par exemple, vous ne pouvez pas utiliser localhost 127.0.0.1 remplacer, ni vice versa.
Cliquez sur la barre de navigation de menu Utilisateurs / Groupes et créer deux nouveaux utilisateurs.
Ces utilisateurs vous tester utilisateurs dans le processus de développement.
Cliquez sur Paramètres du serveur, puis cliquez sur messages hors ligne.
Parce que vous allez XMPP interface pour les notifications,
Hors ligne politique message doit donc être mis à baisser, montre la figure 4.
Vous ne voulez pas enregistrer le message reçu lorsque l'utilisateur est pas connecté, sinon,
Quand ils reviennent, pourraient être "inondé" avec des milliers de notifications.
Plug-par-utilisateur fins notification de démonstration de ce tutoriel, vous aurez seulement besoin d'utiliser ici deux créés par l'utilisateur.
Toutefois, si vous souhaitez que votre application charge la notification par l'utilisateur complexe,
Donc, vous devez être en mesure d'ajouter par programme et supprimer des utilisateurs de la partie PHP de votre application.
Openfire via un service de l'utilisateur plug-in pour XMPP
Interface utilisateur de gestion REST afin de vous fournir cette fonction.
Pour installer ce plugin, télécharger à partir du site de prise Openfire (voir Ressources).
Plug-in lui-même est un fichier unique: userservice.jar.
Vous devez être placés dans votre installation Openfire répertoire / PLU des gins.
[url = XMPP Standards Foundation] XMPP visitez le site officiel:
[/url]http://xmpp.org/. [URL]
Découvrez les détails de XMPP, et apprendre à l'utiliser pour de simples messages =
[url] http://www.ibm.com/developerworks/cn/xml/x-xmppintro/. [URL]
Messagerie évolutive et protocole de présence (XMPP).
En utilisant XMPP, SMS, pureXML et PHP pour créer un système d'alarme.
Apprenez à utiliser Ajax vote pour mettre en œuvre une application Web en temps réel
[URL] http://www.ibm.com/developerworks/cn/web/wa-aj-socket/ URL]
Apprenez à utiliser ce langage de script web
[URL] http://zh.wikipedia.org/wiki/%E9%80%9A%E7%94%A8%E7%BD%91%E5%85%B3%E6%8E%A5%E5%8F% A3 . [URL]
[URL] http://www.informit.com/library/content.aspx?b=STY_JavaScript_24_hours&seqNum=10 . [URL]
En savoir plus sur ce serveur XMPP utilisation écrit en Erlang
[URL] http://processone.github.io/exmpp/ . [URL]
http://www.ibm.com/developerworks/cn/xml/tutorials/x-realtimeXMPPtut/.
Personnalisez votre expérience developerWorks
[URL] http://subject.csdn.net/dw10/ .
http://www.ibm.com/developerworks/ .
Figure 4. Jeter messages hors ligne
Dans les paramètres du serveur, cliquez sur serveur à serveur.Pour cet article, vous ne devez pas vous connecter à un serveur externe,
Parce que vous ne devez pas un plus grand réseaux XMPP
Une partie de raccordement de l'opération.
Par conséquent, le service activé est réglé sur Désactivé,
Autorisés à se connecter à la liste blanche.
Ces paramètres prévenir les dommages non autorisée de connexions
Configurer Apache pour être transmis par BOSH XMPP
Openfire à l'adresse http: // localhost: 7070 / http-bind maintient une URL liaison HTTP,
Pour accéder par BOSH.
Pour utiliser cette URL sur le port 80,
Vous devez configurer le serveur Apache HTTP vers une URL renvoi à cette position.
Pour ce faire, vous devez démarrer le module proxy.
Ouvrez votre http.conf fichier de configuration Apache et localiser la mod_proxy.so et mod_proxy_http.so
LoadModule entrées, elles sont commentées par défaut.
Retrait du signe dièse préambule (#), non commentée.
Dynamic Shared Object du fichier de configuration (DSO) section de support de la ligne appropriée
(Pas nécessairement ensemble) devrait ressembler à 8:
Listing 8. Activer le support de proxy serveur HTTP Apache
=== === Processus d'installation
Archipel l'un des plus grand inconvénient est reflétée dans le processus d'installation: contenu de la documentation est extrêmement rare.
Mais au moins une partie de la description du contexte est tout à fait clair, mais vous devez faire attention à quelques erreurs.
La meilleure façon est de commencer à partir de la ejabberd d'installation, il nécessite au moins la version 2.1.6 est,
Il vaut mieux utiliser un outil d'installation binaire.
Ensuite, vous devez ajouter des modules ejabberd_xmlrpc et mod_admin_extra
Pour étendre le serveur XMPP.
Pour cette raison, l'accès au code source écrit en Erlang,
Puis * .beam ainsi obtenu une copie du fichier ---
--- Pour ejabberd répertoire démon ebin (code segment 1 et segment 2 du code).
Après avoir terminé cette étape, vous devez modifier /opt/ejabberd?2.1.6/conf/ejabberd.cfg
(Selon le communiqué de presse peut être, ce fichier peut être / etc /ejabberd/ejabberd.cfg).
Pour ce faire, activer le module vous venez de créer; et surtout, l'entrée est le nom de domaine entièrement conforme (complet).
Malheureusement, la méthode de configuration décrite dans le projet Archipel est trompeur à plusieurs égards;
Pour ce faire, vous devriez probablement suivre le segment de code 3.
Article du Code 1: ejabberd_xmlrpc
wget http://www.ejabberd.im/files/contributions/
xmlrpc? 1,13? ipr2.tgz
bitumineux? xmlrpc xzvf? 1,13? ipr2.tgz
cd xmlrpc? 1.13 / src
faire
cd ../../
cp ebin / *. /opt/ejabberd?2.1.6/lib/ejabberd?2.1.6/ebin faisceau
Enfin, créer un compte d'administrateur pour compléter les paramètres ejabberd:
eejabberdctl enregistrer mot de passe admin nom de domaine complet
Réglez processus de proxy Archipel à être un peu plus vite, commencer à partir de la vérification des dépendances,
Pour ce faire, vous devez avoir la version Python 2.5 ou version ultérieure,
Version Libvirt 0.8.7 ou plus tard, l'hyperviseur KVM, etc.,
Et la version 0.12.5 Qemu ou plus tard.
En outre, vous devriez avoir qemu-img et outil Paramètres Python.
Code du segment 2: mod_admin_extra
cd / usr / src / ejabberd local /? modules / mod_admin_extra / trunk /
./build.sh
cp ebin / mod_admin_extra.beam
/opt/ejabberd?2.1.6/lib/ejabberd?2.1.6/ebin
Extrait 3: ejabberd.cfg
01 {hôtes, ["jabber.deutschewolke.datenwerk? It.de"]}.
02 [...]
03 {écouter,
04 [
05 {4560, ejabberd_xmlrpc, []},
[06 {5280, ejabberd_http, [
07 http_bind,
08 http_poll,
09 web_admin
10]}
11]}.
12 [...]
13 {modules,
14 [
15 {mod_adhoc, []},
16 {mod_http_bind, []},
17 [...]
18 {mod_admin_extra, []}
19]}.
20 [...]
La séquence de commandes suivantes pour installer l'agent Archipel:
easy_install archipel? agent
Archipel? initInstall
Maintenant, vous devez ajouter le nom de domaine complet du serveur de /etc/archipel/archipel.conf,
Utilisez le script fourni pour commencer Archipel:
/etc/init.d/archipel commencer
Enfin, vous avez besoin de deux noeud pubsub ejabberd, veiller à ce que les systèmes de gestion des autorisations et des étiquettes peuvent travailler:
Archipel? tagnode ?? JID = admin @ nom de domaine complet ?? mot de passe = mot de passe ?? créer
SUCCÈS: pubsub nœud / Archipel / tags créés!
Archipel? rolesnode? JID = admin @ nom de domaine complet ?? mot de passe = mot de passe ?? créer
SUCCÈS: pubsub nœud / Archipel / rôles créés!
Vous ne devez créer manuellement un client, il est décrit en détail dans le wiki Archipel.
Mais tant que le client à choisir la dernière version de l'Archipel, décompressez-le dans un répertoire local,
Ouvrir index.html dans votre navigateur.
Quant à savoir quand vous vous connectez, entrez le entièrement très important compatible Jabber ID; soit
L'ID doit inclure le nom complet du serveur (Figure).
Connectez-vous client Archipel est concerné, vous devez champ Jabber ID
Entrez le nom complet de connexion (y compris domaine).
Votre mot de passe est nécessaire ici les informations que vous spécifiez lorsque vous créez un compte de connexion de l'administrateur.
URL du service BOSH champ suivi http: // FQDN: 5280 / http lier ce modèle !!?
http://melody-free-shaing.blogspot.com/2014/11/update-old-tribal-share-articlemet.html
=============================================
**--Please use Google with a
large family of God translator to translate your country / language city Oh ^ ^
--請各位用家善用谷歌大神的翻譯器,來翻譯你們的國家/城市的語言喔^^
--Por favor, use o Google com
uma grande familia de Deus tradutor para traduzir sua cidade pais / idioma Oh ^
^
--** - 국가 / 언어 시 를 번역하는 하나님 번역기 의 큰 가족과 함께 구글을 사용하십시오 아 ^ ^
--S'il vous plait utilisez
Google avec une grande famille de Dieu traducteur pour traduire votre ville de
pays / langue Oh ^ ^
--Bitte verwenden Sie Google
mit einer grosen Familie Gottes Ubersetzer zu Ihrem Land / Sprache ubersetzen
Stadt Oh ^ ^
--*** - あなたの国/言語の街を翻訳する神トランスレータの大きなファミリーでGoogleを使用してくださいああ^ ^
** - Sila gunakan Google dengan
keluarga besar penterjemah Tuhan untuk menterjemahkan bandar negara / bahasa
anda Oh ^ ^
--** - Utilice Google con una
gran familia de Dios traductor para traducir tu ciudad país / idioma Oh ^ ^
** - Si prega di utilizzare
Google con una grande famiglia di Dio traduttore per tradurre la tua città paese / lingua Oh ^ ^
--Sila gunakan Google dengan
keluarga besar penterjemah Tuhan untuk menterjemahkan bandar negara / bahasa
anda Oh ^ ^
--Bonvole uzu Google kun
granda familio de Dio tradukisto traduki via lando / lingvo urbon Ho ^ ^
** Uzu XMPP por konstrui TTT-bazita sciigo ilo
Uzante XMPP, PHP kaj Javascript retejo aplikoj en reala tempo
-------------------------------------------------- -----------------
Enkonduko: Reala tempo retejo aplikaĵojn reto aplikoj,
Kun ttt-bazita uzanta fasado, la kapableco por montri interreto informoj ĵus liberigita.
Tiaj aplikoj ekzemploj inkludas sociajn novaĵoj agregadores kaj viglado ilojn,
Ili povas uzi datumojn de ekstera fonto estas kontinue ĝisdatigita.
En tiu lernilo, vi kreos malgrandan sciigo ilo Pingstream,
Ĝi uzas PHP kaj Javascript tra la Extensible Messaging kaj ---
--- Presence Protocol (XMPP) komunikilojn
XMPP estas grupo desegnita por subteni en linio kaj en reala tempo komunikado kapabloj de XML teknologio.
Enkonduko == XMPP ==
Tiu sekcio priskribas brevemente la XMPP, ĝia deveno,
Kaj kial tio estas protokolo por reala tempo retejo konektoj.
Vi ekzamenos la komponantoj de XMPP komunikado agordojn kaj vido ekzemploj pruvas kiel uzi tiujn komponantojn.
== Akiru kaj instali XMPP-servilo ==
En tiu ĉi parto vi instalos Openfire XMPP-servilo kaj agordi ĝin por apogi viajn reala tempo aplikoj retejo.
Elektu XMPP-servilo
Estas du ĉefaj malfermita fonto XMPP-servilo povas malŝarĝi senpage.
== Ili estas vaste uzata kaj version 2 permesilo de GNU Publika Permesilo
Ĉiu servilo havas liajn proprajn avantaĝojn kaj malavantaĝojn:
ejabberd: ejabberd en e referencas Erlang, speco de mola reala tempo programlingvoj.
Tiu teknologio ebligas la angulŝtono ejabberd tre rapide.
== Estas ankaŭ tre kongrua kun XMPP kerno kaj rilatajn normojn.
ejabberd povas esti instalita en plej medioj.
Openfire: Openfire kun Java ™ lingvo, uzantamika, facila por instali.
Tiu lernilo uzas Openfire.
-------------------------------------------------- ------------
== Krei Openfire datumbazo ==
Krei novan MySQL datenbazo por via Openfire uzanto kaj agordo.
Per uzanta MySQL, vi povas programmatically el via PHP apliko retejo aldoni,
Redakti, forigi, kaj demandi vian XMPP-servilo uzantoj
Kaj ĝustigi vian XMPP infrastrukturon por kongrui kun via retejo infrastrukturo.
Se vi instalas phpMyAdmin, ekzemple kiel parto de via XAMPP instalado,
Tiam vi povas krei datumbazon en konsento kun la sekvaj paŝoj:
1. Elektu Privilegioj de la ĉefa interfaco.
2. Elektu Aldoni nova uzanto.
3. Aldoni uzanto detaloj (certigi la gastiganto estas localhost;
Tiu lernilo supozas ke vi provas sur localhost)
Elektu Krei datumbazon kun sama nomo kaj donu ĉiuj privilegioj,
Kiel montras Figuro 1. Ne donu tutmonda datumbazo privilegiojn al via datumbazo Openfire novaj uzantoj!
Figuro 1. Adicianta Openfire datumbazo en phpMyAdmin.
Post aldono de la uzanto kaj la datenbazo, vi povas instali la Openfire servilo.instalado Openfire
Elŝutu Openfire instalilo kaj kuri ĝin,
La Openfire instalas al loko laŭ via elekto (vidu Resources).
(Vi povas ankaŭ elekti la Subversion fontkodon deponejo Openfire Openfire ĉekojn ---
--- La lasta versio kaj rekonstrui gxin loke, sed tiu temo estas preter la kadro de tiu ĉi lernilo. )
Kiam instigis, sciigis Openfire instalilo startas la servilo kiam la instalado estas finita.
Post la servilo startas, vi devus vidi la servilo statuso fenestro, montras Figuro 2:
Figuro 2. Openfire statuso fenestro.
Klaku Launch Admin malfermi TTT-bazita sorcxisto, montrita en figuro 3,La sorĉisto prenos vin pasas al paŝo por agordi vian Openfire servilo:
Figuro 3. Agordo Sorĉisto.
Agordo Sorĉisto permesas elekti uzi la norma datumaro rilato aŭ enigita datumbaza konekto.Elektu la norma datumaro rilato, tiel ke vi povas uzi vian MySQL datenbazo.
De la Database Driver Presets listo, elektu MySQL.
Via servilo kaj datumbazan nomon en Database URL kampo.
Ekzemple, surtabligis localhost, MySQL datenbazo nomita openfire en terminoj de,
eniri:
JDBC: mysql: // localhost: 3306 / openfire
Sur la sekvanta ekrano de la sorĉisto, elektu la uzanton kontoj estas stokitaj en la datumbazo.
Entajpu la datumbazo salutnomon kaj pasvorton vi kreis pli frue, kaj tiam daŭrigis ĝis la fino de la agordo sorĉisto.
Je ĉi tiu punkto, vi devus esti kreinta servilo administranto por via XMPP-servilo kaj starigis kampo pozicio!
Uzu vian administranton credenciales ensaluti en establi demarŝo ekrano.
Klaku Edit Properties (lokita sub Server havenoj), registri la servilo nomon listigita.
Tiu nomo formos parton JIDs de via havaĵo.
La nomoj ne estas interŝanĝeblaj,
Ekzemple, vi ne povas uzi localhost anstataŭi 127.0.0.1 nek viceversa.
Klaku sur la supro navigado menuo Uzantoj / Grupoj kaj krei du novajn uzantojn.
Tiuj uzantoj vin elprovi uzantoj en la procezo de disvolviĝo.
Klaku Server kadretoj, kaj tiam alklaku Offline mesaĝojn.
Ĉar vi XMPP interfaco por sciigoj,
Offline Mesaĝo Politiko devus do esti aro al Drop, montrita en figuro 4.
Vi ne volas konservi la mesaĝon ricevita kiam la uzanto ne estas ensalutinta, alimaniere,
Kiam ili revenas, povus esti "inundita" kun miloj da sciigoj.
Plug-po-uzanto sciigo pruvo celoj de tiu lernilo, vi nur bezonas uzi du uzanto-kreitaj tie.
Tamen, se vi volas, ke via apliko por apogi kompleksa po uzanto sciigo,
Do vi bezonas por povi programmatically aldoni kaj forigi uzantojn de la PHP parto de via apliko.
Openfire tra kromprogramon Uzanto Servo por XMPP
Uzanto Management REST interfaco provizi vin kun tiu funkcio.
Instali ĉi kromaĵo, elŝutu ĝin el Openfire plug-ejo (vidu Resources).
Konektu mem estas ununura dosiero: userservice.jar.
Vi devas esti metita en viajn Openfire instalado / plu implikilo dosierujo.
[url = XMPP Standards Foundation] XMPP viziti la oficialan retejon:
[/url]http://xmpp.org/. [URL]
Esplori la detalojn de XMPP, kaj lerni kiel uzi ĝin por simpla mesaĝado =
[url] http://www.ibm.com/developerworks/cn/xml/x-xmppintro/. [URL]
Skalebla mensajería kaj ĉeesto protokolo (XMPP).
Uzante XMPP, SMS, pureXML kaj PHP krei alarmon sistemo.
Lernu kiel uzi la Ajax polling implementar reala tempo apliko retejo
[URL] http://www.ibm.com/developerworks/cn/web/wa-aj-socket/ URL]
Lernu kiel uzi ĉi retejo skripta lingvo
[URL] http://zh.wikipedia.org/wiki/%E9%80%9A%E7%94%A8%E7%BD%91%E5%85%B3%E6%8E%A5%E5%8F% Al3 . [URL]
[URL] http://www.informit.com/library/content.aspx?b=STY_JavaScript_24_hours&seqNum=10 . [URL]
Lernu pli pri tiu uzo XMPP-servilo skribita en Erlang
[URL] http://processone.github.io/exmpp/ . [URL]
http://www.ibm.com/developerworks/cn/xml/tutorials/x-realtimeXMPPtut/ .
Personigitaj developerWorks sperto
[URL] http://subject.csdn.net/dw10/ .
http://www.ibm.com/developerworks/ .
Figuro 4. Forĵeti offline mesaĝojn
En la Servilo agordojn, klaku Server al Servilo.Por ĉi tiu artikolo, vi ne bezonas konekti al ekstera servilo,
Ĉar vi ne bezonas pli grandan XMPP retoj
Rilato parto de la operacio.
Sekve, la Servo Enabled estas agordita Malebligita,
Permesis konekti al Blanka Listo.
Tiuj agordoj malhelpi nerajtigitan rilatoj damaĝo
Agordi Apache esti plusendita de Bosh XMPP
Openfire ĉe http: // localhost: 7070 / http-ligos subtenas HTTP binding URL
Aliri per Bosh.
Por uzi tiun adreson en haveno 80,
Vi devas agordi la Retservilo Apache al URL plusendado al tiu pozicio.
Por fari tion, vi devas komenci la prokurilo modulo.
Malfermu vian http.conf Apache agordo-dosieron kaj lokalizi la mod_proxy.so kaj mod_proxy_http.so
LoadModule enskriboj, ili diris ekstere defaŭlte.
Foriganta la funto signo antaŭparto (#), uncommented.
Dinamika Shared Celo de la agordo-dosiero (DSO) Subteno sekcio en la taŭgan linion
(Ne nepre kune) devas aspekti URL 8:
On 8. Ebligu Retservilo Apache prokurilo subteno
=== Instalaĵo procezo ===
Archipel unu el la plej grandaj malavantaĝo estas reflektita en la instalado: dokumentado enhavo estas ege maloftaj.
Sed almenaŭ parton de la priskribo de la opcio estas sufiĉe klara, sed vi devas pagi atenton al kelkaj eraroj.
La plej bona maniero estas komenci de la instalado Ejabberd, ĝi postulas almenaŭ versio estas 2.1.6,
Best uzi duuma instalado ilo.
Next, vi devas aldoni ejabberd_xmlrpc kaj mod_admin_extra moduloj
Etendi la XMPP-servilo.
Por tiu kialo, aliri al fontkodo skribita en Erlang,
Tiam * .beam tiel akiris kopion de la dosiero ---
--- Por Ejabberd demononName ebin dosierujo (kodo segmento 1 kaj segmento 2 kodon).
Post kompletigi ĉi paŝo vi bezonas modifi /opt/ejabberd?2.1.6/conf/ejabberd.cfg
(Depende de la liberigo povas esti, ĉi tiu dosiero povas esti / etc /ejabberd/ejabberd.cfg).
Por fari tion, ebligu la modulo vi ĵus kreis; kaj plej grave, la enigo estas plene kongrua domajna nomo (FQDN).
Bedaŭrinde, la agordo metodo priskribita en Archipel projekto estas iluzia multrilate;
Por fari tion, vi probable devus sekvi la kodo segmento 3.
Kodo sekcio 1: ejabberd_xmlrpc
wget http://www.ejabberd.im/files/contributions/
xmlrpc? 1.13? ipr2.tgz
tar? xzvf xmlrpc? 1.13? ipr2.tgz
kd xmlrpc? 1.13 / src
fari
kd ../../
cp ebin / *. trabo /opt/ejabberd?2.1.6/lib/ejabberd?2.1.6/ebin
Fine, krei administranto konton kompletigi Ejabberd agordoj:
eejabberdctl registriĝi interfacon FQDN Pasvorto
Fiksita Archipel prokurilo procezo estos iom pli rapida, komenci de dependeco kontrolanta,
Por fari tion vi bezonas Python versio 2.5 aŭ poste,
Libvirt versio 0.8.7 aŭ poste, KVM hypervisor, ktp,
Kaj QEMU versio 0.12.5 aŭ posta.
Krome, vi devus havi QEMU-img kaj Python Agordoj ilo.
Kodo segmento 2: mod_admin_extra
cd / usr / local / src / ejabberd? modulojn / mod_admin_extra / kofro /
./build.sh
cp ebin / mod_admin_extra.beam
/opt/ejabberd?2.1.6/lib/ejabberd?2.1.6/ebin
Fragmento 3: ejabberd.cfg
01 {gastigantoj, ["jabber.deutschewolke.datenwerk? It.de"]}.
02 [...]
03 {aŭskultas,
04 [
05 {4560, ejabberd_xmlrpc, []},
[06 {5280, ejabberd_http, [
07 http_bind,
08 http_poll,
09 web_admin
10]}
11]}.
12 [...]
13 {moduloj,
14 [
15 {mod_adhoc, []},
16 {mod_http_bind, []},
17 [...]
18 {mod_admin_extra, []}
19]}.
20 [...]
La jena vico da ordonoj instali la Archipel Agento:
easy_install archipel? agento
archipel? initinstall
Nun vi devas aldoni la FQDN de la servilo por /etc/archipel/archipel.conf,
Uzu la init skripto provizita komenci Archipel:
/etc/init.d/archipel komenci
Fine, necesas du Ejabberd pubsub nodo, certigi ke la permesoj demarŝo sistemoj kaj etikedoj povas labori:
archipel? tagnode ?? jid = admin @ FQDN ?? password = Pasvorto ?? krei
Sukceso: pubsub nodo / archipel / tags kreita!
archipel? rolesnode? jid = admin @ FQDN ?? password = Pasvorto ?? krei
Sukceso: pubsub nodo / archipel / rolojn kreis!
Vi ne bezonas permane krei kliento, tie estas priskribita en detalo en la Archipel vikio.
Sed tiel longe, kiel la kliento elektas la lastan ĵeton de Archipel, descomprimir ĝin al loka dosierujo,
Malferma index.html en via retumilo.
Kiel kaj kiam oni ensalutas en, tajpu la plene tre grava konsentemaj Jabber ID; tio estas,
La ID devas inkludi la kompletan nomon de la servilo (Figuro).
Saluti Archipel kliento raportas, vi bezonas Jabber ID kampo
Entajpu la plenan ensaluto nomo (inkluzive de regado).
Via pasvorto estas necesa tie ensalutu informo kiun vi specifas kiam oni kreas administranto konton.
URL Servo Bosh kampo follow http: // FQDN: 5280 / http ligos tiun modelon !!?
http://melody-free-shaing.blogspot.com/2014/11/update-old-tribal-share-articlemet.html
=============================================
---"Update the old tribal Share the article**met FDZ"netizens doubt *Use >> XMPP, ejabberd make the solution tested but -all my accounts are not used~*!-
---"更新舊部落分享文章**遇FDZ"網友疑問*使用>> XMPP,ejabberd使測試但~我的所有帳號都不能使用的解決方法~!*-
---"옛 부족 공유에게 문서를 업데이트**충족 FDZ"네티즌 의심*사용 >> XMPP는, ejabberd 테스트the 솔루션을하지만 내 계정이 사용되지 않습니다 -모든~*!-
---"Mettre à jour l'ancienne tribu Partager l'article**rencontrés Fdz"internautes doutent*Utiliser >> XMPP, ejabberd faire la solution testée mais -toutes mes comptes ne sont pas utilisés~*!-
---"Ĝisdatigi la malnova triba Konigi la artikolo**renkontis FDZ"cibernautas dubi *Uzo >> XMPP, ejabberd fari la solvo provita sed -all miaj kontoj ne estas uzataj ~*!-
**USA/UK/TW/SEAOUL KOREAN/HKS/MACAU(FDZ)/FR/UKN/CAL/JP/PH/VI/DE/FA?POL/MAL/HO/RU/THAI/PY/SAN/INDON/ESP`/........All the world lauguage**-
http://melody-free-shaing.blogspot.com/2014/11/update-old-tribal-share-articlemet.html
===Melody.Blog===THE END===>/
&&&&&&&&&&&&&&&&&&&&&&&&&&&&&&&&&&&&&&&&&&&&&&&&&&&&&&&&&&&&
沒有留言:
張貼留言
window.___gcfg = {
lang: 'zh-CN',
parsetags: 'onload'
};